Welcome to your Developer Program! Once you have successfully registered, you should have received an email providing you with login information to your portal site. If you have not received this email, please check your Other/Spam/Junk folders. If you are unable to find your login information, please reach out to developersupport@ecgrid.com for assistance.
Depending on the tier you chose at registration, here are the the allowances based on your chosen tier:
Entry Tier Capabilities
| ECGrid Demo | ECGrid Developer |
Timeframe | No time limit | 30-day free trial |
Connectivity included | Inbound connectivity | All standard connectivity |
KCs / documents | Unlimited – no outbound | 1,500 KCs |
Mailboxes included | 3 | 3 |
With the Developer program, you are able to upgrade to another tier at any point, through self-service. Click on the "Manage Subscription" link on your left side navigation panel. From this page, you can manage your subscription, make payments, or upgrade to another tier for additional volumes and allowances.

First Steps
Setting up a Connection to ECGrid
To begin using your ECGrid Developer program, you will want to set up your connection to ECGrid. For both the Demo and Developer tiers, you are allowed up to 3 additional mailboxes, in addition to your Root level. You have the following options to set up connections.
- You can set up a connection at your Root level and update the Data Path for each of your mailboxes to "Root" to use the single connection at the Root level.
- You can set up individual and unique connections on each mailbox. If you choose this option, ensure the Data Path is set to Mailbox.
To set up your connection on either the Root or Mailbox, click on Root or the mailbox you have created and click on My Connections on the top navigation panel.

From here, you can choose to set up one of the following connections:
- AS2
- SFTP/FTPS
- API
- Web Services Command Line Tool
Documentation is provided on each page enabling you to successfully set up and test your chosen connection.
If you are on the Demo program, you will be able to set up a connection to ECGrid, but data will not be processed outbound from ECGrid to a trading partner or VAN.
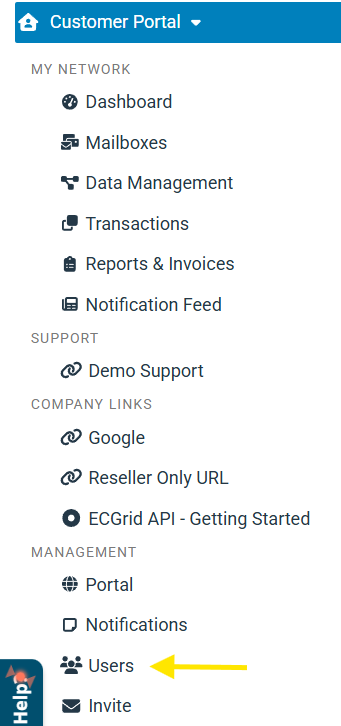
Managing Users
To provide User access to other members within your organization, click on the Users link on your left side navigation panel under Management:
From here, you can grant the following authorization levels:
- MailboxUser: This role essentially provides a read-only set of capabilities on the portal and cannot add/edit/invite users but has limited management capabilities for a single mailbox. This is most likely the role you will want to grant to your customers/contractors when you give them individual mailbox access.
- MailboxAdmin: This role can add/edit/delete IDs, partnerships, and users for a given mailbox. This is the default role for legacy Hubbub users.
- NetworkUser: This role is used by our resellers and their Operations teams to search transactions across all mailboxes on a network. This is a limited role for internal employees.
- NetworkAdmin: This role has full access to customizing the portal, sending notifications, adding/editing users, resending files, and full management of all mailboxes for their customer organizations or trading partners.
- ReadOnly: This role can only view certain pages on the ECGrid Portal and does not have access to the Add/Edit/Delete functions across the portal.
Documentation and Support
You can find documentation under the Need Help tab on the left side navigation panel. If you require Support, please reach out to developersupport@ecgrid.com.

Was this article helpful?
That’s Great!
Thank you for your feedback
Sorry! We couldn't be helpful
Thank you for your feedback
Feedback sent
We appreciate your effort and will try to fix the article